Now that you’ve registered as a Designer on our brand-new, fully-functional Beta Platform, here are some key steps you can take to become a Master:
- Completing your You3Dit profile
- Submitting compelling Design Quotes
- Mastering Design Iterations
- Designing with digital manufacturing in mind
- Being proactive and “wowing” the client
Designers who take these steps get more gigs, improve their design skills more quickly and in general, earn more money from You3Dit. We’re also highlighting current BETA WORKAROUNDS that you can use to be more successful while the platform is “under construction”.
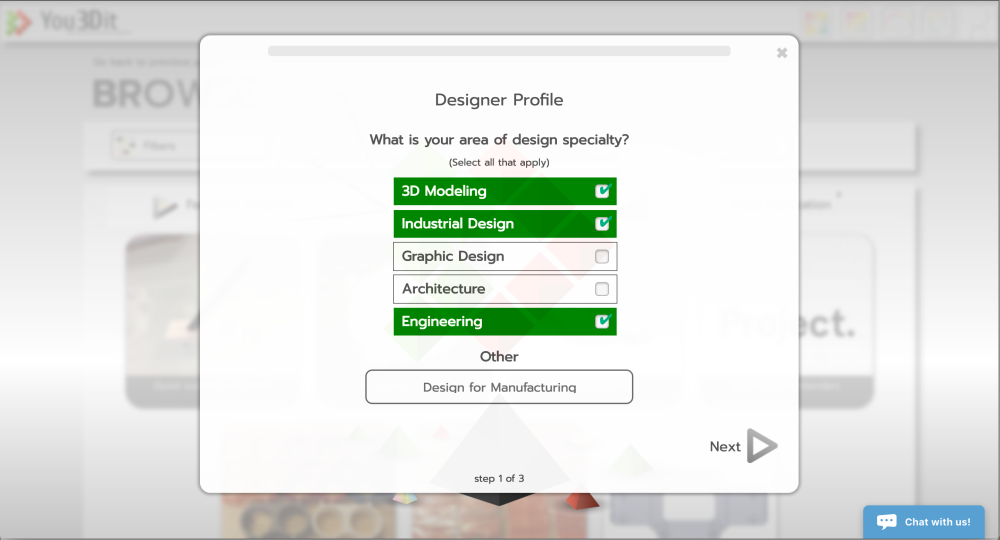
Completing your You3Dit profile
This is all about earning the trust of your potential client. Serious clients want to be able to “see” who their working with and build rapport. Past projects, prior ratings and a compelling reason why you love to design all help. Send this message to prospect clients by completing your profile page by updating your account > navigate to profile > and update the details!
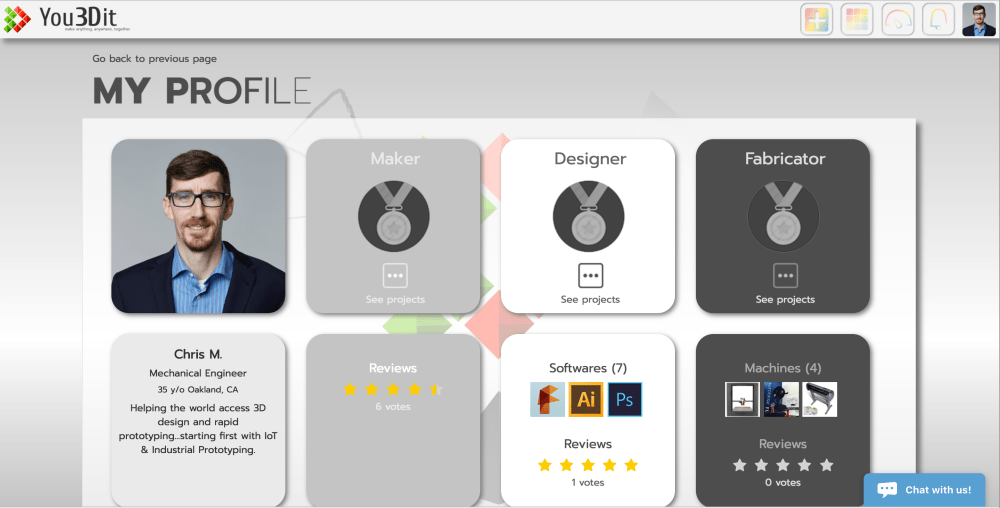
As you can see, Chris M. has been submitting more projects (6) as a maker than he’s designing (1) or fabricating (0) as evidenced by the quantity of reviews he has in each category.
This highlights that not only are the designers & fabricators rated on their performance, but the client as well. Every great designer and fabricator is supported by a responsive and understanding client.
Submitting compelling Design Quotes
There is always a balance between how much time you invest in creating a meaningful quote vs. the likelihood your quote is chosen. The typical Quality vs. Quantity dilemma. We work hard at You3Dit to bring only qualified leads to the marketplace and thus, we encourage our designers to invest time to submit meaningful quotes.
The key ingredients to any meaningful design quote are:
- Speed of response – well-thought-out quotes that are received quickly by the client signal that you are a designer ready and willing to tackle the design challenge.
- Sales pitch…why you? – talk about your relevant design skills, why the CAD tools you will use match the design challenge and consider outlining your design process. This will help the client visualize your pathway to success in creating the 3D Design, thereby earning their trust.
- The right design cost – your quote cost needs to be justified by the design challenge. The more you can understand your prospective client and the goals of their project, the better you can determine if your design skills are right for the job. If you strongly believe you can handle the work, then you have the challenging task of determining the value of your work. Most pricing boils down to speed, quality and cost to perform the work. Figure out what the client needs by reviewing the project description & supporting files in detail and asking any remaining questions in the “public commentary” section of a project page.
- Relevant sample work – if the client is looking for a design that will eventually be CNC machined in 6061 aluminum, share prior 3D design and engineering work that highlights your skills in designing products that are manufactured out of metal–aluminum all the better. The 3D CAD model + final product images are a great way to convince your client that you have the right skills to complete the job on time. Some of our designers even take the bold approach to proactively sketching out or even 3D modeling a rough design of the client’s proposed project. Flavio V. for example, clearly illustrates how he envisions this client’s project goal by 3D modeling the part from the get go based on the client-provided sketch:
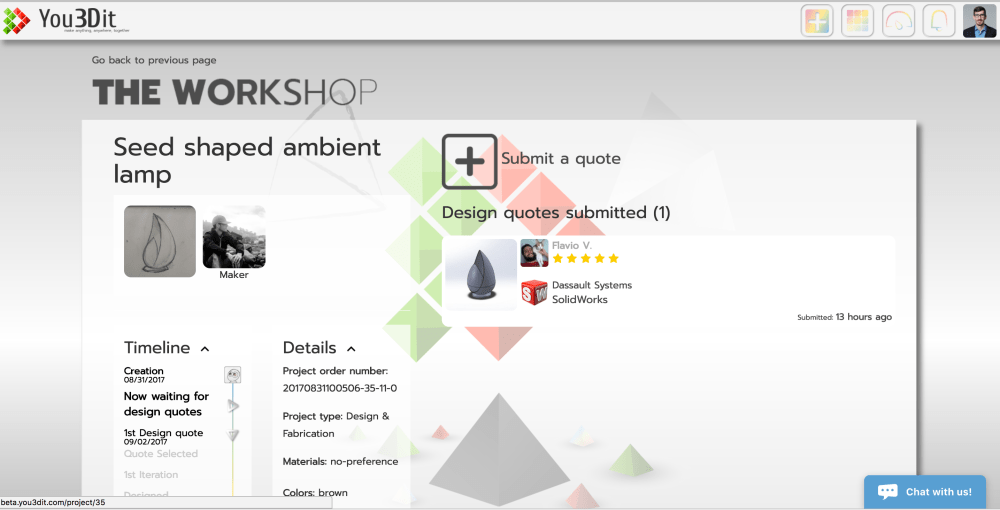
Flavio–a well-respected You3Dit Designer–submits an image of the 3D model he created in response to the client’s project description. If he’s on the same page as the client, he’s also likely first in line to land the gig. If he’s off a little bit, no big deal. The client has the opportunity to communicate how his design should change in the public commentary, enabling other designers to better understand what the client is thinking. - A timeline commensurate to cost – we’ll talk more about this in the next section but make sure you plan for at least 3x iterations with the client and increase your fee accordingly to accommodate for those additional costs. Prepare for oversights, miscommunication and unexpected design challenges.
- Ask for help if you need it – we have our customer support standing by in our chat tool ready to help you with quoting should you need it. Just click the “Chat with us!” box in the bottom right hand corner of your screen.
Mastering Design Iterations
Congratulations! The client chose your quote and now you’ve begun the design process. This is where you transform the client’s idea from their napkin sketch to a 3D CAD model of their part, product or prototype. You’re able to communicate directly with the client and submit design iterations. The ultimate goal is to deliver a 3D Design iteration which meets all the clients “wants” and “needs” in as few iterations as possible.
An official design iteration is composed of:
- One or more “preview images” and
- Raw design file(s) needed to produce the parts.
Iterations submitted with only one or the other make it difficult downstream on both the client & the fabricator.
BETA WORKAROUND #01: Upload an iteration without a file or want to send a number of other files in the chat? Simply use Dropbox, Box or Google Drive to create a shareable link.
You3Dit Beta is iteration focused. Most clients, designers and fabricators rarely think of all the functional requirements and features of their part, product or prototype until they see the first design iterations. Uncovering a flaw in the design before you produce real parts or prototypes, you can save a lot of money in the manufacturing & assembly processes. Here’s an example of an iteration during the Design phase of a You3Dit Beta project:
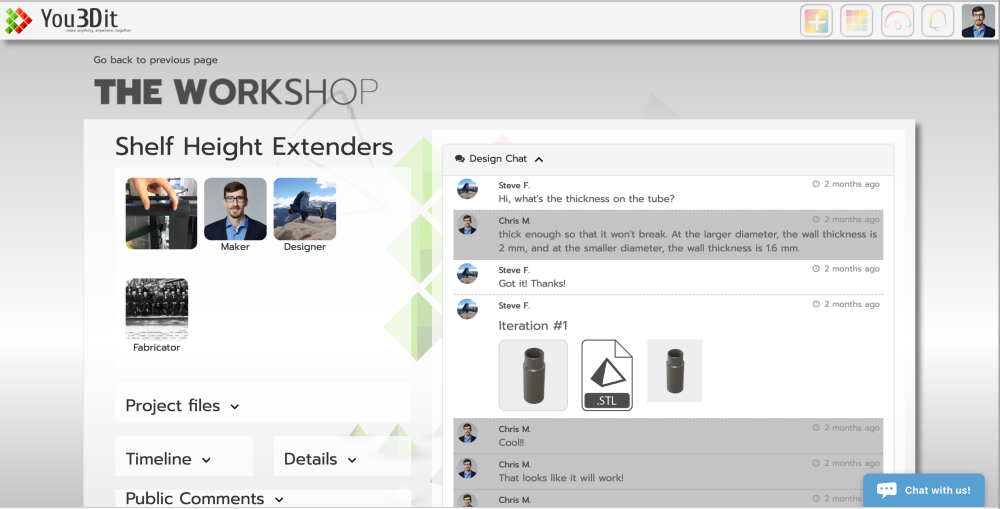
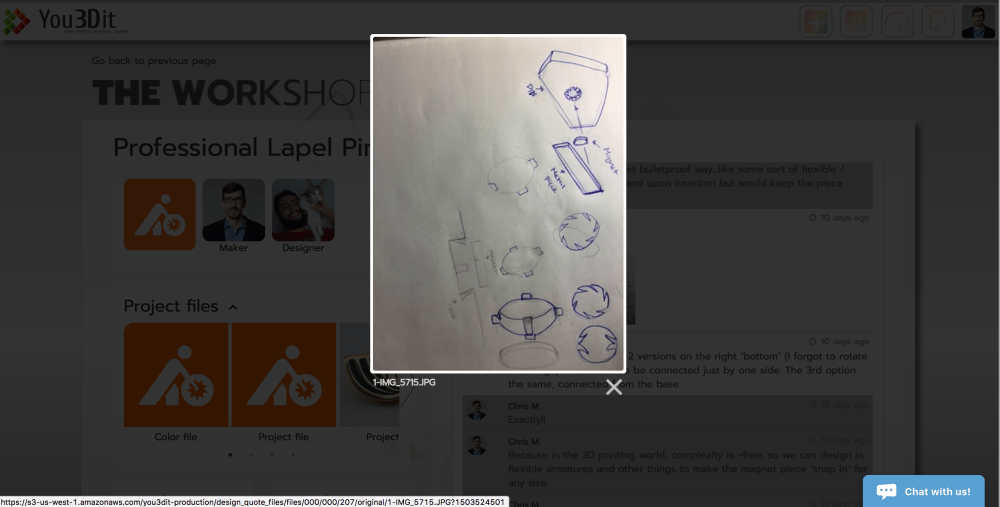
In this Shelf Height Extender project client went through a couple of iterations before they chose the final design iteration, but this is normal. Plan for at least 3 iterations once you submit your initial design. These really should be design “tweaks” of sorts (minimal changes) vs. full-blown re-designs. This is where it makes a lot of sense to submit hand-drawn sketches to get a solid understanding of where the client’s head is with regard to their design vision. You can see in this following image that the designer submitted a “sketch” to confirm if he was heading the right direction before he submitted another CAD-based iteration.
BETA WORKAROUND #02: Simply let the client know that you’re submitting an unofficial iteration if you’re NOT including a raw design file that could be manufactured. This is useful when you want to send reference sketches, relevant designs / products with similar attributes, etc. Again, an official iteration includes one or more preview images and one or more raw 3D Design file that a fabricator needs to run their machine to produce the physical part.
If you believe the client is asking too much or you’re having trouble with the iteration process, please just “Chat with us!” in the blue bar at the bottom right hand side of the screen and we can help you out. You’ll always get the opportunity to rate your client (aka “the maker”) at the end of the process.
Designing with digital manufacturing in mind
You3Dit is a one-of-a-kind, an end-to-end service that transforms client napkin sketches into real, physical parts. By linking both the design AND fabrication processes in our marketplace, we are able to dramatically improve client success by minimizing wasted production & assembly costs through intelligent design. Thankfully, experts agree with this hypothesis [1] and many references are available which detail how one can improve their skills in design for manufacture & assembly.
The designers in our You3Dit network naturally embrace the fabrication side of product development by designing with digital manufacturing in mind.
The common digital manufacturing tools our fabricators use to help our clients prototype their designs are 3D Printers, Laser Cutters and CNC machines. We loosely define a digital fabrication tool which can produce a part from a 3D CAD file with only minimal involvement & manual control by fabricator. The machine should do the lion’s share of the work and technology has enabled machines to manufacture complex parts that would be impossible to manually create by a human.
That being said, not all designs are created equal and these machines work better when the Designer has thought about how the part will ultimately be fabricated. Including a flat surface in a design often dramatically improves 3D printing performance (provides a solid base layer for part adhesion in Fused Filament Fabrication) while a multi-colored, large, multi-part assembly structure might be more easily produced using a laser cutter or CNC router (like Ikea flat-pack furniture design). Each type of manufacturing process likely requires a unique design methodology, often leverages different design tools (Illustrator vs. Fusion360 for example) and likely two different quotes & approaches from the designer. Submitting multiple design quotes for each methodology is OK.
Understanding these subtle differences and design strategies separates novice designers from a masters and comes with experience.
There are many references that discuss design for manufacturing and assembly (DFMA) which talk about how “design casts a large shadow on manufacturing” [2] and others which have a number of techniques you can put into practice right away to improve your designs [3].
How can you determine what type of machines the client might want to use to produce their parts? Here are some hints:
- Look at the project quantity – if they want 1-10 parts, this can likely be easily achieved for a reasonable cost using a consumer-grade 3D printer or laser cutter. If they want 100+ parts, then you need to consider machines that are more mass-production ready like CNC machines & laser cutters. That being said, our friends at Forecast3D are pushing for mass production of 3D printed parts using the new HP Multijet Fusion technology and have some very innovative ways to compete with traditional plastic injection molding technology.
- Understand the project quality requirements – does this client want something designed and built that will be highly personal, wearable, on display in their home? Did they mention “Apple-like quality” in the project description? This is probably not a good fit for 3D printing (as the part qualities are typically low and are much better for functional, “works-like” prototype testing). By contrast, laser cutters are a great combination of speed & flexibility to produce parts while maintaining above-average quality. Personally, I’d avoid any project that requests “Apple-like quality” unless they’re Apple or some other large company with a lot of money and resources to put behind the work.
- Assess the part complexity – if the part has many complex geometries, undercuts and would fit in a 12″x12″x12″ box, then this could be a good candidate for 3D printing, where “complexity is free”. However, if it’s more planar in nature (think rectangles, circles and 2D geometries), then the part would be a good fit for laser cutting or CNC machining (think Ikea furniture-like geometries).
- Understand the part use case – if the part(s) will be loaded with large forces, it’s likely the materials used in 3D printing or laser cutting will be insufficient to avoid mechanical failures. Thus metal production methods would be better and thus, CNC machines, water jet cutters or plasma-metal cutting lasers would be good candidates.
- Material requirements – some materials can only be produced on specific machines. This can quickly help you filter the range of possible manufacturing machines. Plastics: 3D printers, CNC machines and laser cutters, Metals: CNC machines, some laser cutters and expensive 3D printing machines. Woods / Organics: Laser cutters and CNC routers. This is very general but hopefully you get the idea.
- Start making things yourself – Good 3D Printers are inexpensive today. For $600, you can get a super robust and reliable Printrbot 3D Printer. This will quickly accelerate your understanding of design for additive manufacturing.
- Ask someone for help – if you’re new and unsure, you can simply ask You3Dit support or even the client. Talking through the use cases with the client or an expert from You3Dit will help you filter the range of possible manufacturing machines.
Being proactive and “wowing” the client
In general, clients simply want to feel like the center of attention and don’t require much to be “wow’ed”. Remind yourself that you’re helping the client go a napkin sketch to a physical part. That used to be reserved for hardware engineers and big companies only.
To wow your clients in the design phase, try some of these best practices out:
- Keep everyone updated – a simple and quick update on your progress will not only keep you on track, will also let the client know there’s progress being made. A simple question or a quick unofficial iteration image is enough to keep them excited about your progress.
- Focus on one project at a time – while we do enjoy the multitude of projects that come through the You3Dit network, you can really wow your client if you stay on top of your work. It’s true that other work can inspire ideas and some projects do not require a full-day’s work, but if you can focus and get the project done in record speed, the client will appreciate your efforts getting the project completed. Just don’t sacrifice quality for speed.
- Make a prototype part yourself – in many high-end design projects on You3Dit, we expect our designers to do this as a way to validate their 3D Designs. However, in other cases, this is a great way to wow the client as it convinces them that the design you constructed is in fact manufacturable.
- Educate the client – You3Dit has a company principle which is all about education for the client. If we can educate the client on how the design process works, why you’re putting specific features where (like fillets in sharp corners), etc., they’ll get better on the next project and you’ll dramatically improve our sketch > solid process. Anytime you can teach someone something, they’re learning and growing and that’s been slated as a pathway to happiness.
- Communicate project opportunities and challenges – it’s easy to share great news with a client. It’s more difficult to alert them of potential issues. Remember, by catching a design flaw in the design phase, you’re potentially saving them thousands of dollars in fabrication costs. Measure twice, cut once. By being proactive, you can help them find new solutions and transform “impossible” to possible.
Pat yourself on the back, you’ve made it to the end. We hope this helps you become a You3Dit Design Master on our new Beta Platform. Please share with us your thoughts and questions in the comments below or e-mail me directly: chris at you3dit dot com.
REFERENCES:
[1] Integrating design and manufacturing for competitive advantage / edited by Gerald I. Susman.
[2] Product design for manufacture and assembly / Geoffrey Boothroyd, Peter Dewhurst, Winston A. Knight.
[3] Design for manufacturability handbook / James G. Bralla, editor.

One thought on “Mastering You3Dit Beta as a Designer”